Next.js Application: Effective Optimization Guide 2025
Introduction: In the rapidly evolving landscape of web development, Next.js application has emerged as a leading framework for crafting dynamic,


Search Engine Optimization (SEO) is the foundation of online visibility. It ensures your website is discoverable by search engines like Google and Bing, which in turn helps users find your content.
While most people think of SEO in terms of keywords and backlinks, developers play a critical role by implementing Technical SEO, the behind-the-scenes optimizations that make websites crawlable, indexable, and performance-ready.
For Next.js developers, this is especially important because Next.js is a framework built for speed and flexibility, offering built-in features that make technical SEO implementation seamless.
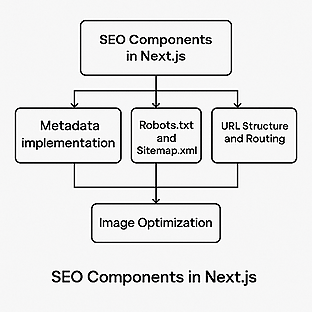
In this article, we’ll break down the core aspects of Technical SEO in Next.js, explain why each is important, and walk through practical examples.
Also read our other blog: Step-by-Step Guide to Deploying Mattermost on AWS (2025)
SEO (Search Engine Optimization) is the practice of improving your website’s performance and visibility in search results. It can be broadly divided into three categories:
This focuses on what’s visible on your website. It ensures search engines understand your content:
<h1> for main title, <h2>, <h3> for subtopics).Example: An article page should have one <h1> with the blog title, while subsections use <h2> or <h3>.
This covers signals outside your website that improve trust and authority:
This is the developer’s responsibility. It ensures the website is properly structured, accessible, and indexable by search engines.
Key technical tasks include:
Without Technical SEO, your site may load fine for users but still remain invisible to search engines.
Important Concept About Metadata in Next.js:
Sitelinks are additional links that appear under the main URL in Google’s search results. They help users navigate to key sections of your website directly.

Why sitelinks matter:
Important Notes:
The robots.txt file is your site’s instruction manual for crawlers. It tells search engines:
Example implementation in Next.js (App Router):
// app/robots.js
export default function robots() {
  return {
    rules: {
      userAgent: '*',
      allow: '/',
      disallow: ['/admin/', '/api/', '/private/'],
    },
    sitemap: '<https://yourdomain.com/sitemap.xml>',
  }
}
Explanation:
Here you should be careful about your private routes like admin side or others which you don’t want to be crawled or indexed by Google. Set those into the disallow section.
Testing:
Note: Multiple sitemaps are allowed – You can list as many sitemap URLs as you want in your robots.txt file or submit them in Google Search Console.
A sitemap is basically the file that you submit to Google Search Console (GSC) containing priority-specific links that search engines crawl and index based on their priority. It helps search engines discover and understand your site structure more efficiently. It is an XML file that lists all important pages on your site.
In Next.js, you can either generate it statically or dynamically.
In Next.js, you can create a static sitemap by manually generating an XML file containing all your website URLs. This approach works well for smaller sites with fixed content, as the sitemap does not change unless you update the file. You can place this static sitemap.xml in the public folder, allowing search engines to easily discover and index your pages. Use static sitemap for small sites.
For small websites with fixed pages:
// app/sitemap.js *(for static content)*
export default function sitemap() {
  return [
    {
      url: '<https://yourdomain.com>',
      lastModified: new Date(),
      changeFrequency: 'yearly',
      priority: 1,
    },
    {
      url: '<https://yourdomain.com/about>',
      lastModified: new Date(),
      changeFrequency: 'monthly',
      priority: 0.8,
    },
    {
    url: '<https://yourdomain.com/services>',
    lastModified: new Date(),
    changeFrequency: 'weekly',
    priority: 0.5,
    },
  ]
}Next.js provides built-in sitemap generation, but for more complex scenarios, you can use packages like next-sitemap to create dynamic sitemaps based on your content. Use dynamic sitemap for blogs, e-commerce, or dashboards with frequent updates.
// app/sitemap.xml/route.js
export async function GET() {
*// Fetch data from your API*
  const posts = await fetch('<https://yourdomain.com/api/posts>'),{
  next: { revalidate: 3600 } *// Optional: cache for 1 hour*
  }).then((res) => res.json())
  const postUrls = posts.map(post => ({
    url: `https://yourdomain.com/blog/${post.slug}`,
    lastModified: new Date(post.updatedAt),
    changeFrequency: 'weekly',
    priority: 0.7,
  }))

  const staticUrls = [
    { url: '<https://yourdomain.com>', lastModified: new Date(),changeFrequency: 'yearly',
     priority: 1},
     {
	     url: '<https://yourdomain.com/about>',lastModified: new Date(),changeFrequency: 'monthly',priority: 0.8,},WEAQ
  ]

  const allUrls = [...staticUrls, ...postUrls]
  const sitemap = `<?xml version="1.0" encoding="UTF-8"?>
  <urlset xmlns="<http://www.sitemaps.org/schemas/sitemap/0.9>">
    ${allUrls.map(url => `
      <url>
        <loc>${url.url}</loc>
        <lastmod>${url.lastModified.toISOString()}</lastmod>
        <priority>${url.priority}</priority>
      </url>`).join('')}
  </urlset>`

  return new Response(sitemap, { headers: { 'Content-Type': 'application/xml' } })
}
Alternative: Using next-sitemap package For more complex sitemap generation, you can use the next-sitemap package:
npm install next-sitemapFile Location:
Key Points:
Important Note: When fetching data for sitemaps, API calls should be made in server components, not client components, as sitemaps are generated at build time or server-side.
Best practices:
Testing:
Your Sitemap will look like this:

Metadata is crucial for SEO as it tells search engines what your pages are about. It includes:
<title>)Understanding Metadata Hierarchy in Next.js:
// app/about/page.js
export const metadata = {
  title: "About Us | My Website",
  description: "Learn more about our company...",
  keywords: ["nextjs", "seo", "web development"],
  openGraph: {
  title: 'Home | Your Website Name',
  description: 'Your homepage description for SEO',
  url: '<https://yourdomain.com>',
  siteName: 'Your Website Name',
  images: [
  {
  url: '<https://yourdomain.com/og-image.jpg>',
  width: 1200,
  height: 630,
  alt: 'Your Website Name',
  },
  ],
  type: 'website',
  },
  twitter: {
  card: 'summary_large_image',
  title: 'Home | Your Website Name',
  description: 'Your homepage description for SEO',
  images: ['<https://yourdomain.com/og-image.jpg>'],
  },
}The generateMetadata function is essential for dynamic pages where metadata depends on the content being displayed (like blog posts, product pages, etc.):
// app/blog/[slug]/page.js
export async function generateMetadata({ params }) {
// Fetch post data
  const post = await getPost(params.slug)
if (!post) {
  return {
  title: 'Post Not Found',
  }
  }
  return {
    title: `${post.title} | My Blog`,
    description: post.excerpt,
    openGraph: {
      title: post.title,
      description: post.excerpt,
      keywords: post.tags,
      openGraph: {
      title: post.title,
      description: post.excerpt,
      url: `https://mydomain.com/blog/${post.slug}`,
      siteName: 'Your Blog Name',
      images: [
      {
      url: post.featured_image,
      width: 1200,
      height: 630,
      alt: post.title,
      },
      ],
      type: 'article',
      publishedTime: post.publishedAt,
      modifiedTime: post.updatedAt,
      authors: [post.author.name],
      },
      twitter: {
      card: 'summary_large_image',
      title: post.title,
      description: post.excerpt,
      images: [post.featured_image],
    },
  }
}
export default function BlogPost({ params }) {
// Your component logic
}
Key Points to Remember:
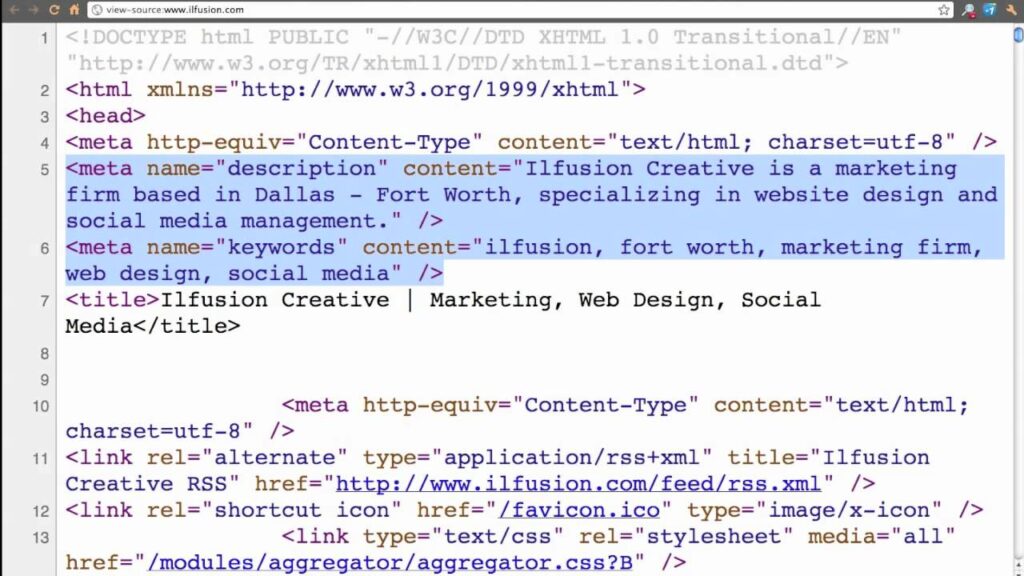
This allows you to inspect the raw HTML that the browser is rendering, including your <head> section where metadata resides.
2. Verify the <title> Tag:
3. Check <meta name=”description”>:
4. Check <meta name=”keywords”>:
5. Verify Open Graph Tags (OG Tags):
<meta property="og:title"> and <meta property="og:description">.6. Verify Twitter Card Tags:
<meta name="twitter:card"> and <meta name="twitter:title">.7. Confirm All Metadata Appears in<head>:
<head> section of your HTML.<head>
<title>Your Blog Post Title | Your Website Name</title>
<meta name="description" content="Your blog post description for SEO">
<meta name="keywords" content="nextjs, seo, web development">
<meta property="og:title" content="Your Blog Post Title | Your Website Name">
<meta property="og:description" content="Your blog post description for social sharing">
<meta name="twitter:card" content="summary_large_image">
<meta name="twitter:title" content="Your Blog Post Title | Your Website Name">
</head>Source Code Example:

By checking your page source, you can ensure that all metadata is implemented correctly, which improves SEO, enhances social sharing, and ensures your content is properly indexed by search engines.
This is how metadata flows from Next.js to the browser and search engines for your blog:

Server-Side Component Requirement:
Dynamic pages require special handling because the content changes depending on the route or parameters.
app/
 └─ blog/
     └─ [slug]/
         └─ page.js ← Implement generateMetadata here
[slug] folder represents a dynamic blog post.generateMetadata is defined in page.js to fetch content for that specific post.Static Pages:
// app/about/page.js (Server Component)
export const metadata = {
  title: 'About Us | Your Website',
  description: 'Learn more about our company...',
}

export default function AboutPage() {
  return <div>About content</div>
}Dynamic Pages:
// app/blog/[slug]/page.js (Server Component)
export async function generateMetadata({ params }) {
  const post = await getPost(params.slug)
  return {
    title: `${post.title} | Your Blog`,
    description: post.excerpt,
  }
}

export default function BlogPost({ params }) {
  // Component logic
}
generateMetadata is an asynchronous function that fetches the specific blog post using params.slug.Important Points:
generateMetadata to fetch content and generate metadata dynamically.After implementing the above steps, always test:
1. Check robots.txt: Visit https://yourdomain.com/robots.txt in your browser
2. Check sitemap.xml: Visit https://yourdomain.com/sitemap.xml in your browser
3. Verify metadata: Use browser dev tools to inspect meta tags in the <head> section
4. Test on localhost first: Ensure all static and dynamic pages render correctly. Always test in development before deploying.
Important: You must deploy your website to a live domain before Google can crawl and index your files. Having a live domain makes it much easier for Google’s crawlers to discover and index your content.
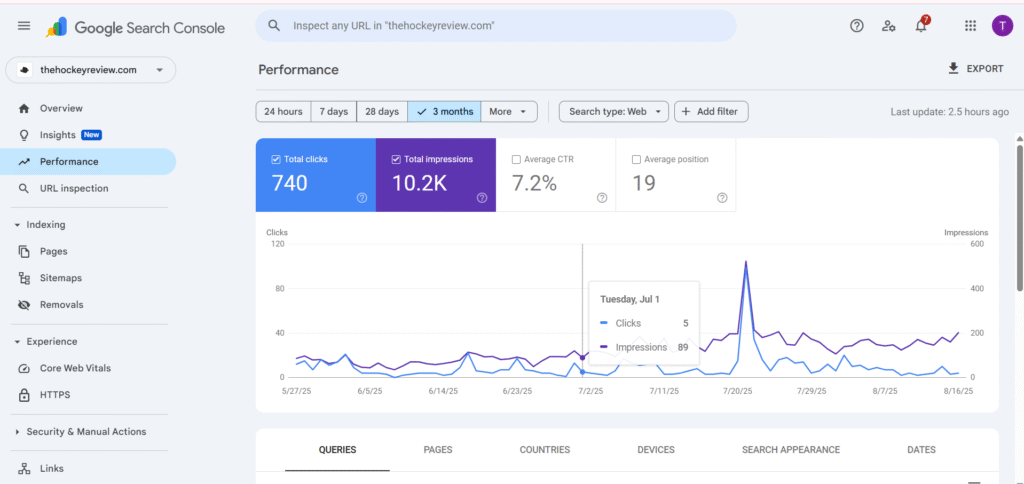
After successfully implementing robots.txt, sitemap, and metadata, it’s time to move to Google Search Console (GSC) to submit your sitemap and monitor your site’s performance.
What is Google Search Console?
Google Search Console (GSC) is a free tool provided by Google that helps you monitor and maintain your site’s presence in Google search results. Think of it as a bridge between your website and Google’s crawlers – it helps facilitate smooth interaction between search engine bots and your website, allowing you to directly communicate with Google about your site’s performance and issues.

For detailed technical guidance, refer to the official Google Search Console documentation.
/blog/technical-seo-nextjs instead of /blog?id=123app/blog/[slug]/page.jsalt attributes for accessibility and SEO.import Image from 'next/image'
<Image
src="/images/seo-guide.png"
alt="Technical SEO guide in Next.js"
width={800}
height={400}
/>Search engines favor websites that load fast and provide a smooth user experience.
next/image .
Implementing technical SEO in Next.js ensures your website is search-engine-friendly, fast, and scalable. By following metadata best practices, optimizing images, maintaining clean URLs, and providing proper sitemaps, developers can significantly improve visibility and performance.
Next.js, with its server-side capabilities and modern tooling, makes it easier than ever to build an SEO-friendly website.

Introduction: In the rapidly evolving landscape of web development, Next.js application has emerged as a leading framework for crafting dynamic,
2024@Digitalux All right reserved